Ready for a vibrant hair transformation that's fun and affordable? Well, it's almost time to think about a fresh look, and maybe, just maybe, you're dreaming of something bold but not forever. Perhaps you're curious about a temporary splash of color that won't break the bank or commit you for months. For many, the idea of changing up their hair color can feel like a big step, but what if there was a simple way to experiment without all the fuss?
It's crazy how quickly time seems to move, isn't it? Can you believe we are this close to July and that the year is half over? As the days fly by, a lot of people find themselves wanting to try something new, something that expresses a bit of personality. And honestly, when it comes to hair, there are so many ways to do that. You see pictures of the hottest hairstyles, haircuts, and colors, and you start to wonder if there’s a right new 'do for you, a simple change that makes a big difference.
This article shows you how to dye your hair with Kool-Aid using simple techniques. It’s a pretty cool way to get a new look, and it works great on dark hair colors with no bleaching required! Plus, Kool-Aid is a great way to dye hair without doing anything permanent. It lasts longer than hair chalk, and it isn't as chunky as colored hair spray. Best of it, it is cheap to use, so you can try out different shades without a lot of expense.
- Yellow Smiley Face Phone
- кишлак обои
- Waffles Mlp Cute
- Horror Film Posters
- Short Haircut Styles For Men With Straight Hair
Table of Contents
- What Exactly Is Kool-Aid Hair Dye?
- The Science Behind the Stain
- Why Pick Kool-Aid for Your Hair?
- Getting Ready: What You'll Need
- Step-by-Step: How to Dye Your Hair with Kool-Aid
- Tips for Different Hair Types
- Making the Color Last
- Important Things to Remember
- Beyond the Basics: Creative Ideas
- Frequently Asked Questions About Kool-Aid Hair Dye
What Exactly Is Kool-Aid Hair Dye?
Kool-Aid hair dye is just what it sounds like: using the powdered drink mix to add temporary color to your hair. This method has been around for quite a while, and it’s a favorite for those who want a bit of fun without a long-term commitment. It's a rather simple approach, and it doesn't involve harsh chemicals often found in traditional hair dyes, which is a big plus for some folks.
This approach is really popular for things like school spirit days, costume parties, or just a weekend change. It's especially appealing because it’s so inexpensive. You know, you can pick up a few packets of Kool-Aid for a very small amount of money, and you're pretty much ready to go. It's a rather straightforward process, and it doesn't require any special tools or complicated preparations.
The Science Behind the Stain
So, how does this actually work? The science behind the stain is pretty interesting, if you think about it. Hair is a protein filament that grows from follicles found in the dermis. It's one of the defining characteristics of mammals, and the human body, apart from areas of glabrous skin, is covered in follicles which produce thick terminal and fine vellus hair. This article gives an overview of the structure of hair; it explains how it grows, what it’s made of, and how it changes.
The dye in Kool-Aid is a food coloring. These food colorings have molecules that are just the right size and shape to cling to the outer layer of your hair shaft. Your hair, being a protein, has tiny, open scales on its surface, and these dye molecules can slip right in. Unlike permanent dyes that open up the hair cuticle and change the hair's internal structure, Kool-Aid just sits on the outside, which is why it's temporary.
From someone who dyes their hair, I would think Kool-Aid would stain like crazy, and it does, in a way. The acidic nature of Kool-Aid, especially with a little vinegar added, helps those dye molecules stick better. This is why you get that noticeable color. It's a pretty clever trick, really, using something meant for drinking to change your hair's appearance, more or less.
Why Pick Kool-Aid for Your Hair?
There are several good reasons why people choose Kool-Aid for their hair coloring adventures. For one, it’s incredibly affordable. You can get a packet for pennies, which makes it a very budget-friendly option for trying out a new shade. This is great if you're someone who likes to change your look often or if you're on a tight budget, you know?
Another big plus is that Kool-Aid is a great way to dye hair without doing anything permanent. It’s temporary, so if you don’t like the color, it will fade out over time. This takes away a lot of the pressure that comes with traditional hair dyes. It’s not like you’re stuck with it forever, which is rather comforting.
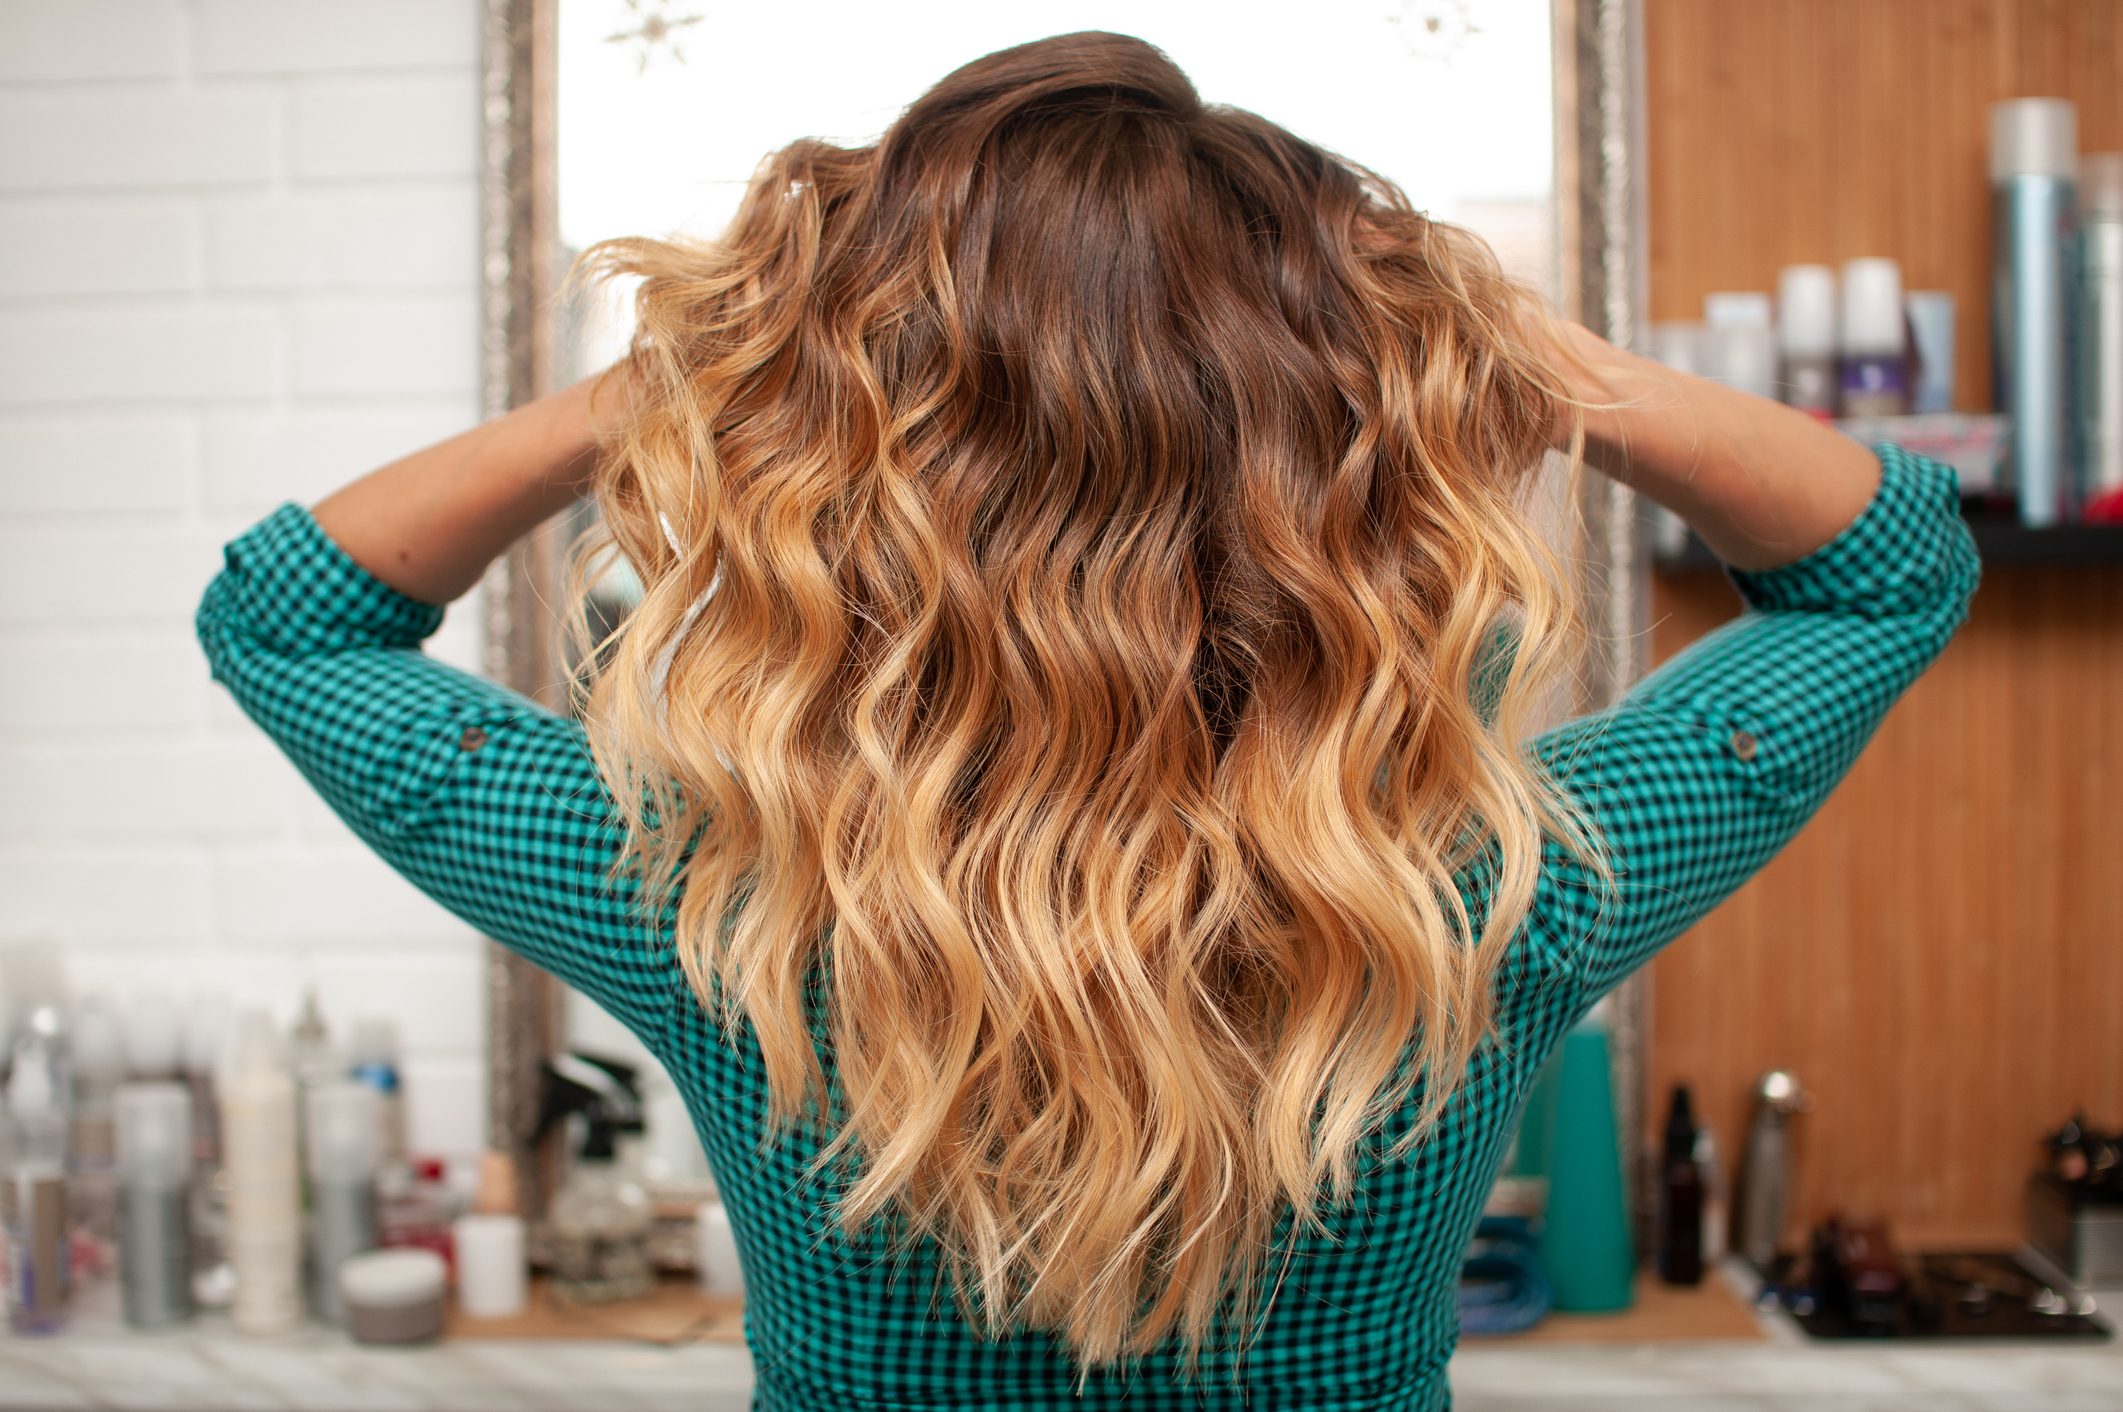
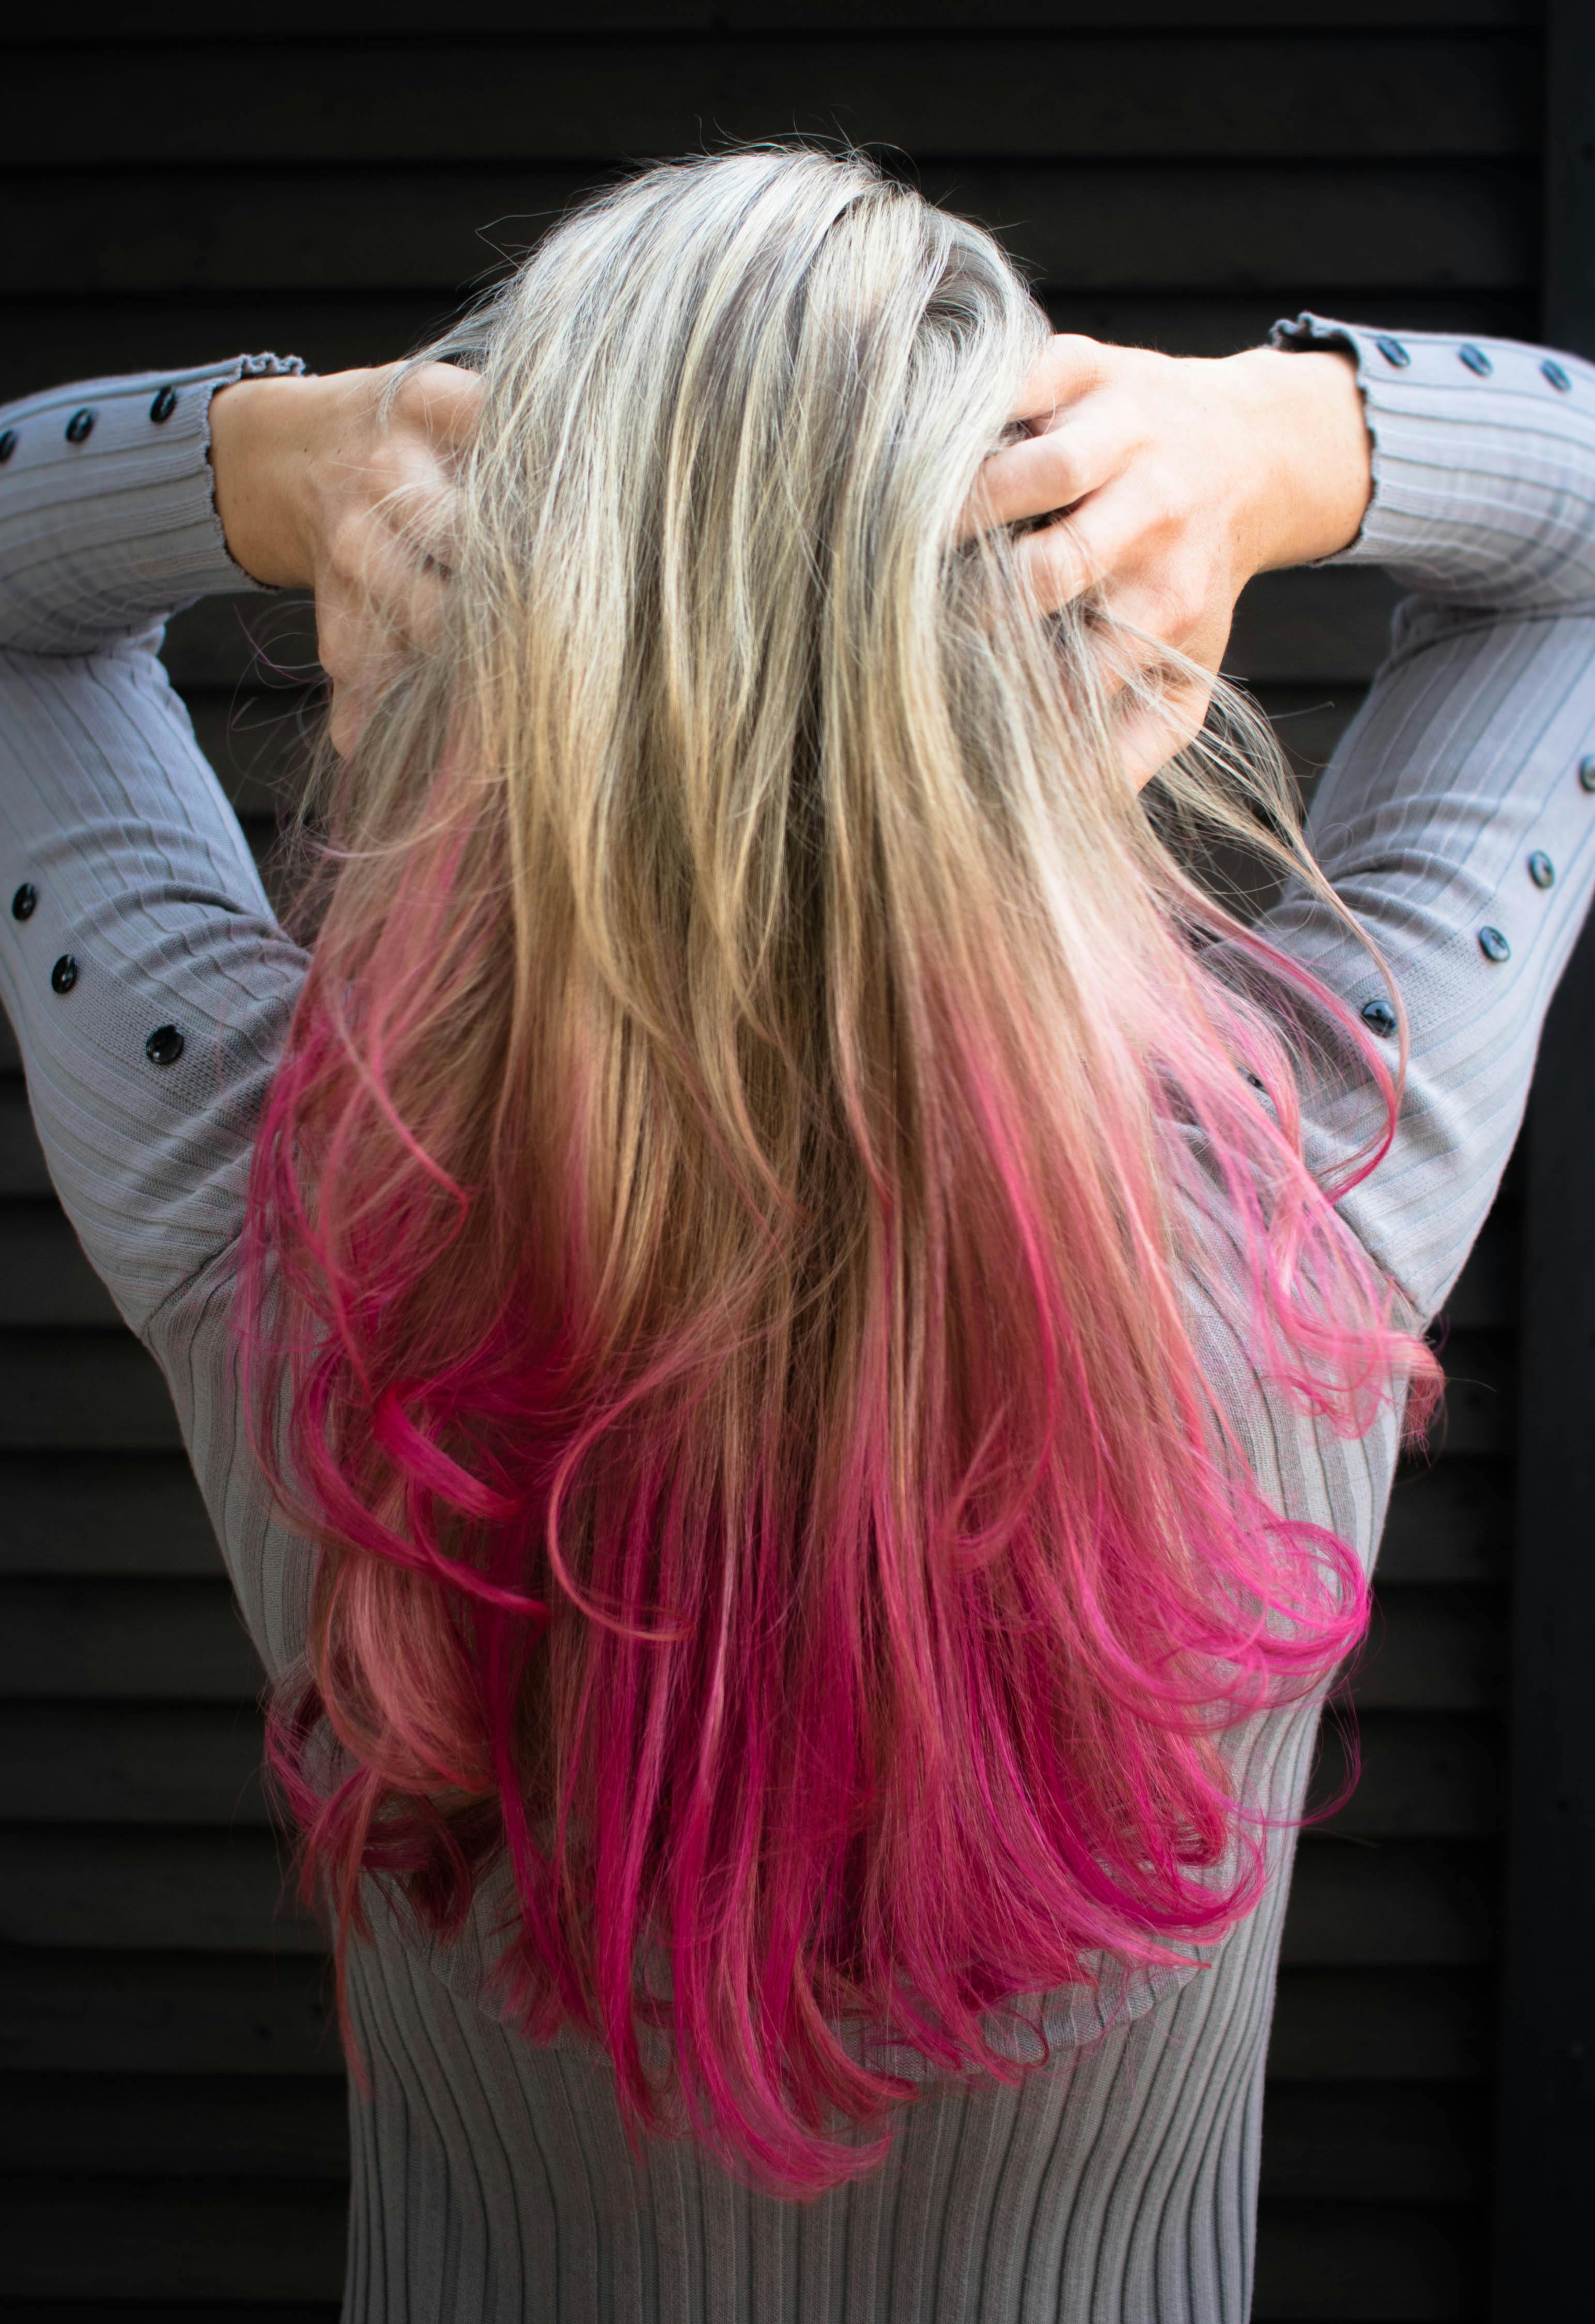
Also, it even works great on dark hair colors with no bleaching required! This is a huge benefit because bleaching can be quite damaging to hair. Many temporary dyes or hair chalks don't show up well on darker strands unless you lighten them first, but Kool-Aid can give a noticeable tint, especially with darker, more concentrated colors like cherry or grape. It’s pretty amazing, actually, how well it can show up.
It lasts longer than hair chalk, and it isn't as chunky as colored hair spray. Hair chalk can rub off easily and often leaves a powdery feel, while colored hair spray can feel stiff and look unnatural. Kool-Aid gives a more natural-looking stain that feels like your own hair, which is definitely a preference for many people. It’s a bit more subtle, in a way, than those other options.
Getting Ready: What You'll Need
Before you start, gather everything you'll need. This makes the process a lot smoother, you know? You'll want to have all your supplies within reach so you don't have to scramble mid-dye. It's really just a few basic items, nothing too fancy.
- Kool-Aid packets: Choose your desired colors. Darker colors like cherry, grape, or black cherry tend to work best and show up more vibrantly, especially on darker hair. You'll likely need 2-4 packets per section of hair, depending on how much hair you're coloring and how intense you want the shade.
- Water: For mixing the Kool-Aid.
- White vinegar (optional but recommended): A little bit of vinegar can help the color stick better, especially for a more intense or longer-lasting result. It also helps to open the hair cuticle just slightly, allowing the color to settle in more effectively.
- Mixing bowl or container: Something you don't mind getting stained. A plastic bowl or an old glass jar works well.
- Gloves: Seriously, you'll want these. From someone who dyes their hair, I would think Kool-Aid would stain like crazy, and it absolutely will stain your hands.
- Old towels: To protect your clothes and surfaces. This is rather important, as you don't want to accidentally dye your favorite shirt.
- Comb or brush: For detangling and distributing the mixture.
- Hair clips or ties: To section off your hair.
- Applicator brush or spoon: For applying the mixture, if you're not dipping.
- Plastic wrap or shower cap: To cover your hair while the color sets.
- Old newspaper or plastic sheeting: To protect your work area.
Step-by-Step: How to Dye Your Hair with Kool-Aid
Learn how to dye your hair with Kool-Aid using simple techniques in this article. The process is pretty straightforward, but a little preparation goes a long way. Remember, the goal is fun, temporary color, so don't stress too much about perfection, you know?
Preparation
- Protect your space: Lay down old newspapers or plastic sheeting on your counter or floor. This is a crucial step, as Kool-Aid can definitely stain surfaces.
- Protect yourself: Put on those gloves! And wear old clothes that you don't mind getting stained.
- Wash and dry hair (optional): Some people prefer to start with clean, dry hair. Others find that slightly damp hair helps the color absorb better. If your hair is too oily, the color might not stick as well. So, consider giving it a quick wash and then towel-drying it a bit.
Mixing the Kool-Aid
- Choose your shade: The duration of the color depends on the shade—darker colors like purple tend to last longer than pastel. So, if you want something that sticks around for a bit, go for grape or cherry.
- Combine ingredients: In your mixing bowl, empty 2-4 packets of your chosen Kool-Aid. Add about 1-2 cups of hot water. Stir until the powder is fully dissolved. If you're using white vinegar, add about 2-3 tablespoons to the mixture. The more concentrated the mixture, the more vibrant the color will be, naturally.
- Let it cool: Make sure the mixture isn't too hot before applying it to your hair. Warm is fine, but you don't want to burn yourself.
Method 1: Dip Dye the Ends of Your Hair
Use this Kool-Aid hair dye method to dip dye the ends of your hair. This is a rather popular way to try out a bold color without committing to an all-over change. It’s simple, and it looks pretty cool, honestly.
- Section your hair: Use clips to separate the sections of hair you want to color. This might be just the very ends, or a bit higher up, depending on the look you’re going for.
- Dip away: Carefully dip the ends of the chosen hair sections into the Kool-Aid mixture. Make sure the hair is fully submerged.
- Soak time: Let your hair soak for at least 30 minutes. For more vibrant results, especially on darker hair, you might want to leave it in for an hour or even longer, like several hours. Some people even leave it overnight for maximum color saturation, wrapping their hair in plastic wrap.
- Rinse: Once you're happy with the color, rinse your hair with cool water until the water runs clear. Try to avoid shampoo for the first rinse, as it can wash out too much color.
- Dry: Gently towel dry your hair. The color will be most noticeable once your hair is completely dry.
Method 2: All-Over Color or Streaks
If you're feeling a bit more adventurous and want an all-over tint or some bold streaks, this method is for you. It's a little more involved, but still very doable, you know?
- Apply the mixture: You can either pour the cooled Kool-Aid mixture over your head in the shower (standing in an empty tub to catch drips) or apply it with an applicator brush to specific sections. If you're doing streaks, use foil to separate them, much like you would with traditional highlights.
- Saturate thoroughly: Make sure every strand you want colored is completely saturated with the Kool-Aid mixture. This is key for even color.
- Cover your hair: Once applied, cover your hair with plastic wrap or a shower cap. This helps to keep the mixture from drying out and encourages the color to set.
- Wait: Just like with the dip dye, let the color sit for at least 30 minutes, or up to several hours for a more intense shade. Darker colors might need more time, generally.
- Rinse and dry: Rinse with cool water until the water runs clear. Again, try to skip shampoo for the first rinse. Then, dry your hair to reveal your new look.
Tips for Different Hair Types
Determining your hair type can help you find out the best ways to style and care for it, and it also plays a part in how Kool-Aid dye might take. There are four main hair type categories: straight, wavy, curly, and kinky or coiled. Depending on a person’s hair type, they may need to follow different care instructions, including what type of products to use. This also applies to how the Kool-Aid will work, in a way.
- Straight Hair: This type of hair typically takes color very evenly. You might find that the color shows up quite well, even with shorter processing times.
- Wavy and Curly Hair: These hair types can sometimes be a bit more porous, which means they might absorb the color more readily. However, ensuring even saturation can be a little trickier due to the texture. Take your time applying the mixture to every curl and wave, so you don't miss any spots.
- Coily/Kinky Hair: This hair type is often very porous and can absorb color quite well. However, because of the tight coils, it's very important to make sure the mixture is thoroughly worked into every section. You might need a bit more mixture and a longer soaking time for a really noticeable result.
- Dark Hair Colors: As mentioned, it even works great on dark hair colors with no bleaching required! For dark hair, you'll want to use darker, more concentrated Kool-Aid colors like cherry, grape, or black cherry. You'll also likely need to leave the mixture on for a longer period, perhaps several hours or even overnight, to get a noticeable tint. The color might appear more as a subtle sheen in direct light rather than a bright, bold shade, but it's definitely there.
Making the Color Last
The duration of the color depends on the shade—darker colors like purple tend to last longer than pastel. Generally, Kool-Aid hair dye is temporary and will fade with each wash. However, there are a few things you can do to help it stick around for a bit longer, if that's what you want, obviously.
- Wash Less Often: The more you wash your hair, the faster the color will fade. Try to extend the time between washes.
- Use Cool Water: When you do wash your hair, use cool water. Hot water opens the hair cuticle, which lets the dye molecules escape more quickly.
- Gentle Shampoos: Opt for sulfate-free shampoos or those designed for color-treated hair. These are usually gentler and less likely to strip the color.
- Avoid Heat Styling: Excessive heat from styling tools can also make the color fade faster. Try to air dry your hair when you can, or use heat protectant sprays if you must use heat.
- Vinegar Rinse: A final rinse with a diluted vinegar solution (about 1 part vinegar to 2 parts water) can help seal the cuticle and lock in the color a bit more.
Important Things to Remember
While Kool-Aid hair dyeing is fun and generally safe, there are a few things you should keep in mind to ensure a good experience. These are pretty important, you know, for a smooth process.
- Staining: From someone who dyes their hair, I would think Kool-Aid would stain like crazy, and it does. It will stain your skin, clothes, towels, and surfaces. Always wear gloves, old clothes, and protect your workspace. If you get it on your skin, try to wash it off immediately with soap and water, or a little rubbing alcohol might help.
- Patch Test: Always do a patch test on a small, hidden section of hair first. This lets you see how the color will look on your specific hair type and how long you need to leave it in for the desired intensity. It’s also a good idea to do a skin patch test to check for any allergic reactions, though rare with food coloring, it's a good practice.
- Not for Light Hair: While it works on dark hair without bleach, be very careful if you have very light, bleached, or porous hair. The color can be much more intense and might even be harder to remove completely. If you have light hair, you might want to dilute the mixture more or reduce the processing time.
- Temporary, but not instant fade: Kool-Aid is a great way to dye hair without doing anything permanent, but it won't just disappear after one wash. It fades gradually. The duration of the color depends on the shade—darker colors like purple tend to last longer than pastel. Expect it to last anywhere from a few washes to a couple of weeks, depending on your hair type and how you care for it.
- Color Mixing: You can mix different Kool-Aid flavors to create custom shades! Just remember to test them on a small strand first.
Beyond the Basics: Creative Ideas
Once you get the hang of using Kool-Aid for hair, you might want to try some more creative looks. There are so many possibilities, honestly, when you start thinking outside the box a little bit.
- Hidden Colors: Dye a layer of hair underneath your top layer for a fun surprise that only shows when you tie your hair up or move it around.
- Rainbow Strands: Use different colors on individual small sections of hair for a multi-colored effect. This can be a bit more time-consuming, but the results are pretty striking.
- Ombre Effect: Instead of a sharp dip-dye line, gradually apply the Kool-Aid further up the hair shaft, blending it for a softer transition.
- Temporary Highlights: Use a cotton swab or a small brush to apply thin streaks of Kool-Aid for a highlighted look.
- Seasonal Shades: Match your hair color to holidays or seasons. Think vibrant reds for summer, deep purples for fall, or even a subtle blue for winter.
Ready for a new look? Using Kool-Aid is a fun, low-commitment way to experiment with hair color. You'll find the right new 'do for you, even if it's just for a little while. Learn more about hair care tips on our site, and check out our page on hair styling ideas for more inspiration!
Frequently Asked Questions About Kool-Aid Hair Dye
How long does Kool-Aid hair dye typically last?
The duration of the color really depends on a few things, you know? The shade you pick is a big factor; darker colors like purple tend to last longer than pastel ones. Also, how often you wash your hair, what kind of shampoo you use, and your hair's natural porosity all play a part. Generally, you can expect it to stick around for a few washes, maybe up to a couple of weeks, but it will gradually fade over time, obviously.
Can Kool-Aid hair dye work on dark hair without bleaching?
Yes, it absolutely can! That's one of the really great things about using Kool-Aid. It even works great on dark hair colors with no bleaching required! For the best results on darker hair, you'll want to choose more intense colors, like grape, cherry, or black cherry. You'll also likely need to let the mixture sit on your hair for a longer period, perhaps several hours, to get a noticeable tint. It might show up more as a subtle, colorful sheen in direct light, but it's definitely there, which is pretty cool.
Is Kool-Aid hair dye safe for kids or sensitive scalps?
Kool-Aid is a food product, so it's generally considered less harsh than chemical hair dyes. It’s a great way to dye hair without doing anything permanent. However, like with any product you put on your skin or hair, it's always a good idea to do a small patch test first. This helps you check for any potential irritation or allergic reactions, even though they're pretty rare with food coloring. For kids, it’s a fun, temporary option, but supervision is always a good idea, naturally.
- Womens Medieval Hunter Outfit
- Tim Henson Wife
- Womens White Angel Heels
- Who Does Camille Charriere Hair
- Stardew Valley Bathroom Furniture Mod