Have you ever found yourself wishing you could turn a light on or off from more than one spot in a room or a hallway? Maybe you've got a long corridor, or a big living space, and walking all the way to one end just to flip a switch feels like a bit of a chore. Well, you know, there's a neat solution for that, and it involves something called a three-way switch. This little gadget lets you control a single light from two different spots, making life just a little bit easier in your home.
For a good while now, people have been using these clever switches. Historically, three-way switches were introduced in the late 19th century, really changing how we manage lights in houses and even bigger buildings. They made it so much more convenient to get around, especially in places where you might enter from one door and leave from another. This article will provide a detailed look at how these work, so, you can get a better grip on them.
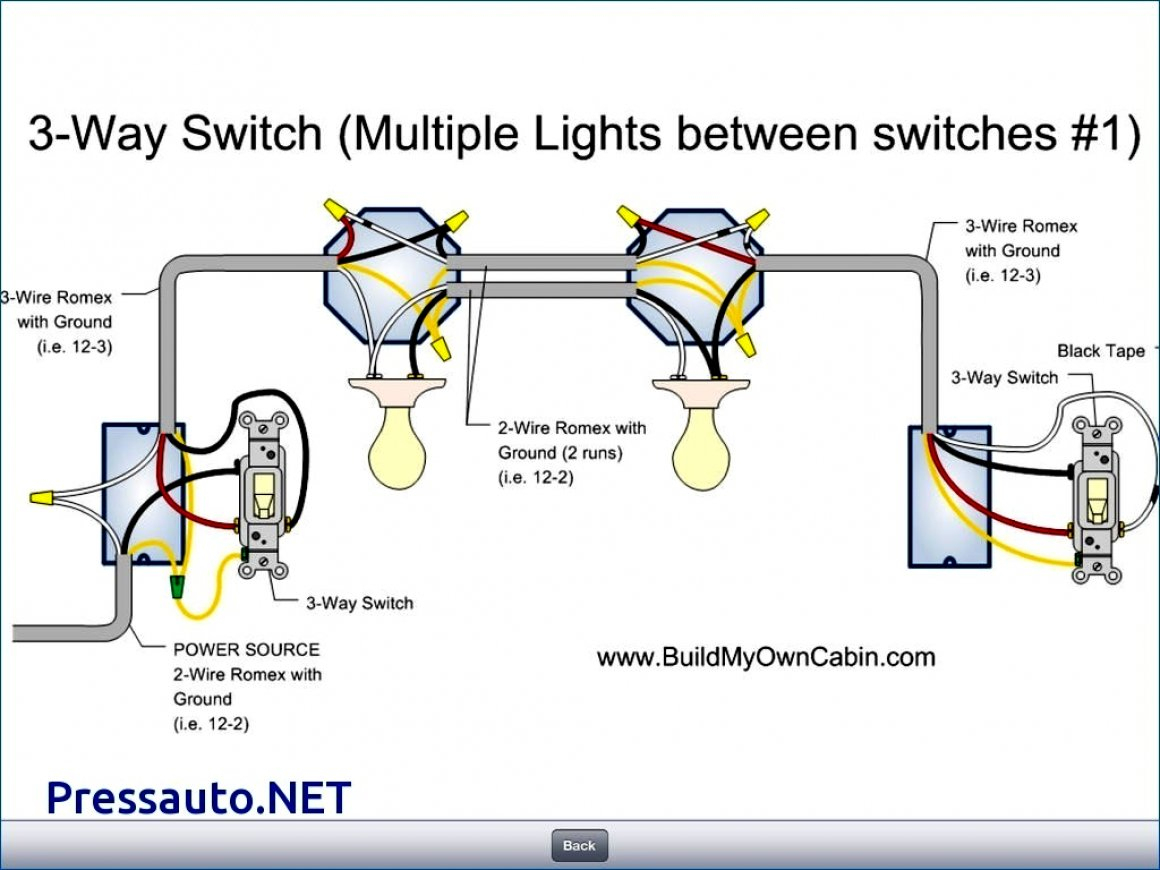
Learning how to wire a three-way switch with a detailed schematic diagram can seem like a big task at first, but it's really about understanding a few key connections. We're going to explore these connections, the parts involved, and the ways you can put them together for controlling lights from two different locations. The diagrams below will give you a clear picture, helping you to understand the steps for proper installation and troubleshooting if things don't go as planned. So, let's get started with understanding the wire diagram of a 3 way switch.
Table of Contents
- What is a Three-Way Switch?
- Why Use a Three-Way Switch?
- Key Parts of a Three-Way Switch
- Tools and Materials You'll Need
- Safety First When Working with Electricity
- Understanding the Wiring Configurations
- Steps for Proper Installation
- Troubleshooting Common Issues
- Frequently Asked Questions (FAQs)
- Final Thoughts on Your Wiring Project
What is a Three-Way Switch?
A light switch, in its most basic form, is a pretty simple electrical gadget. It just turns things on or off. But a three-way switch is a bit more involved, you know, allowing you to control one light fixture from two separate spots. It's not like a regular on-off switch that just has two terminals; this one has three or sometimes four screw terminals, which gives it its special ability to connect to other points. This setup is really useful in bigger rooms, stairwells, or hallways where having a light control at each entrance just makes sense, honestly.
Why Use a Three-Way Switch?
The main reason people put in three-way switches is for convenience, pretty much. Imagine walking into a dark living room from one door and being able to turn on the lights right there. Then, when you're ready to leave through another door, you can just turn them off from that second spot. This means you don't have to walk across a dark room to get to a single switch, which, as a matter of fact, is a nice safety feature too. It's a very practical choice for areas where you have multiple entry or exit points, like a long hallway or a large basement.
Key Parts of a Three-Way Switch
When you look at a three-way switch, you'll notice it has some specific connection points. It typically illustrates the common terminal, which is usually a darker colored screw, often black or bronze. This common terminal is where the constant power comes in, or where the switched power goes out to the light fixture. Then, there are two other terminals, usually lighter colored, which are called the traveler terminals, or sometimes just traveler wires. These traveler wires run between the two three-way switches, carrying the power back and forth, you know, to make the magic happen. Understanding these parts is quite important for getting the wire diagram of a 3 way switch right.
- Best Of Starbucks Drinks
- Pink Butterfly Wallpaper
- What Are Omodoki Hair Made Out Of
- Aang Costume
- Adidas Gazelle Maroon
Tools and Materials You'll Need
Before you get started with any electrical work, it's a good idea to gather everything you might need. Here are the tools and materials you’ll need for this kind of project, basically. You'll want a voltage tester to make sure the power is off, a wire stripper to prepare your wires, and a screwdriver set, both Phillips and flathead, for the screws on the switches. You'll also need wire nuts to join wires together, and, of course, the two three-way switches themselves, plus the appropriate electrical wire, which is typically 14/3 or 12/3 Romex, depending on your circuit's amperage. Having these things ready makes the job go smoother, honestly.
Safety First When Working with Electricity
Working with electricity can be quite serious, so safety should always be your top concern. If you’re not comfortable working with electrical circuits, it’s always best to call a qualified electrician. Before you touch any wires, always, always, turn off the power at the circuit breaker that feeds the light or switch you are working on. You should then use a voltage tester to confirm that the power is indeed off at the wires you plan to handle. This step is non-negotiable for your safety, obviously, and helps prevent any shocks or other issues.
Understanding the Wiring Configurations
The core of understanding the wire diagram of a 3 way switch comes down to how the power enters the system and where the light fixture is located. Basically, you need to feed in power at one of the switches or at the light fixture itself. There are four different ways of wiring the switch, and each has its own diagram. These diagrams will help you see the path electricity takes. We'll describe each of these common setups, giving you a clear picture of the connections. You'll really want to pay attention to where the power line, the common wire, and the traveler wires go in each scenario, you know, for proper function.
Configuration 1: Power at the First Switch, Light at the End
In this common setup, the electrical power line, the one coming from your circuit breaker, goes directly to the first three-way switch. This power wire connects to the common terminal on that first switch. From this first switch, two traveler wires then run to the second three-way switch. These travelers connect to the two traveler terminals on both switches. Then, from the common terminal of the second three-way switch, a single wire goes out directly to the light fixture. The neutral wire from the power source also goes directly to the light fixture, and the ground wires connect to all the boxes and devices. This is a very straightforward path for the current, pretty much.
Configuration 2: Power at the Light, First Switch in the Middle
This setup is a little different because the main power line first goes to the light fixture itself, which can happen in some older homes or specific installations. So, the hot wire from the power source connects to the light fixture. From the light fixture, a wire then runs to the common terminal of the first three-way switch. The two traveler wires connect the two three-way switches, as usual, linking their traveler terminals. Finally, a wire from the common terminal of the second three-way switch goes back to the light fixture. The neutral wires are also connected at the light fixture, and ground wires are, you know, properly tied in at all points. This arrangement, while less common for new work, is still something you might see.
Configuration 3: Power at the First Switch, Light in the Middle
Here, the power comes into the first three-way switch, connecting to its common terminal. From this first switch, two traveler wires go to the second three-way switch. However, in this scenario, the light fixture is located between the two switches. So, the common wire from the first switch goes to the light, and then another wire from the light goes to the common terminal of the second switch. This means the light receives its switched power from the first switch, and the second switch controls the path of the travelers. It's a bit more involved with the wiring at the light box, as a matter of fact, because both the power and the travelers pass through it.
Configuration 4: Power at the Light, Second Switch at the End
In this last main configuration, the power source again goes directly to the light fixture, similar to configuration 2. However, the path from the light to the switches is different. From the light, wires run to the first three-way switch. Then, the traveler wires run from the first three-way switch to the second three-way switch. The common wire from the second three-way switch then goes back to the light fixture. This setup often involves a bit more wire in the light fixture box, as both the power input and the switched output from the second switch meet there. It’s pretty much about understanding the flow of electricity from its source, through the switches, and to the light. Each of these diagrams will give you a clear visual of how these connections are made, helping you to put it all together. You can find more general electrical information at a trusted source like the National Electrical Code website, which is very helpful for safety and standards.
Steps for Proper Installation
Once you understand the wire diagram of a 3 way switch, putting it all in place involves a few careful steps. First, always make sure the power is off at the circuit breaker. Then, identify your wires: the hot wire from the power source, the neutral wires, the ground wires, and your traveler wires. Connect the hot wire to the common terminal of your first three-way switch. Then, connect your two traveler wires between the traveler terminals of both switches. Finally, connect the common terminal of your second three-way switch to the wire going to your light fixture. All neutral wires should be connected together, and all ground wires should be connected to each other and to the switch boxes. Double-check every connection, you know, before turning the power back on. Learn more about home wiring projects on our site, and find more tips on this page for advanced setups.
Troubleshooting Common Issues
Sometimes, even with a good wire diagram of a 3 way switch, things don't work perfectly the first time. Understanding the connections and steps for proper installation and troubleshooting can save you a lot of frustration. If your light isn't turning on or off from both locations, the first thing to check is that all wires are securely fastened to their correct terminals. A loose connection is a very common culprit. Also, make sure the common wire is indeed connected to the common terminal, and the travelers are on the traveler terminals. If one switch works but the other doesn't, it often points to an issue with the traveler wires or the common wire on the non-working switch. A simple continuity test with a multimeter can help you trace where the break in the circuit might be, basically. Always remember to turn off the power before you start poking around, obviously.
Frequently Asked Questions (FAQs)
What are traveler wires in a 3-way switch setup?
Traveler wires are the two wires that run between the two three-way switches. They don't carry constant power; instead, they carry the power back and forth between the switches, allowing either switch to complete or break the circuit to the light. They are, you know, essential for the dual control to work.
Can I replace a 3-way switch with a regular on/off switch?
No, you cannot directly replace a three-way switch with a standard on/off switch. A regular switch only has two terminals and is designed for single-point control. A three-way switch needs three terminals (one common and two travelers) to work with another three-way switch. Trying to swap them out without changing the wiring would cause problems, pretty much, as the circuit wouldn't function as intended.
Why isn't my 3-way switch working after installation?
There are a few common reasons why a three-way switch might not work after you put it in place. The most frequent issue is incorrect wire connections, especially mixing up the common wire with a traveler wire. Another common problem is loose connections at the terminals or in the wire nuts. Sometimes, the circuit breaker might be tripped, or the switch itself could be faulty. Always double-check your wire diagram of a 3 way switch against your actual connections, and confirm the power is on at the breaker, you know, after you've checked everything else.
Final Thoughts on Your Wiring Project
Getting a handle on the wire diagram of a 3 way switch can feel like a real accomplishment. It's a very practical skill for any homeowner or anyone interested in home improvements. Remember, the key is to take your time, understand each connection, and prioritize safety above everything else. If you ever feel unsure about any step, or if the wiring seems too complicated, don't hesitate to reach out to a certified electrician. They can provide the help you need and make sure everything is put in place safely and correctly. Knowing how to wire a three-way switch with a detailed schematic diagram can really give you a sense of control over your home's lighting, and that's a good feeling, honestly.
- Tattoos In Triangles
- Things To Do With A Shallow Bird Bath
- Cross Backgrounds For Iphone
- Art Deco Patterns
- X Men Phoenix Unleashed Art